My shopping cart
Your cart is currently empty.
Continue ShoppingLooks like we’ve gotten ourselves into another crazy project! Our long term friend and staff member, Michael Simmons, plays with the BANJO RACKETEERS, a cool ensemble featuring banjos of all sizes, from the tiny ukulele banjo up to the giant bass banjo. Recently, their bass player left the group and took his big bass banjo with him, so it seemed appropriate to come to the rescue of this crazy bunch.
Certainly the heart of any banjo is its “pot” or shell, and many bass banjos are made from regular drum shells with a bass neck attached. Being not of sound mind, I came up with the suggestion that the Racketeers deserved a bass banjo that looked as much as possible like a regular banjo, but supersized. So, to get the project rolling, I offered to come up with an appropriate pot, starting with an idea that the Vega Little Wonder 17-fret tenor would be a good choice to scale up. After some head scratching, I came up with the notion of taking a regular size banjo and upsizing it by multiplying all the dimensions by about 1-2/3.
So, I set about measuring an old Vega, and came up with 20″ diameter as the logical choice for the head diameter. No point in making this thing an odd size, because we’d want to be able to use regular easy-to-find drum heads when replacement was necessary.
I have a fairly complete machine shop in my garage, and I’m able to reproduce some kinds of machined banjo parts, so this project is giving me quite a workout! And, it’s a nice break from making Frank’s Cranks.
Here’s how it’s going. . .

In New Hampshire, there’s a cool outfit called Keller that makes drum shells for the industry. They were my source for the rings you see above. I bought a 20-inch diameter, 24-inch long laminate cylinder that was probably intended for bass drum manufacture. Drum shells are way too thin for banjo use because two dozen banjo tension hooks generate quite a lot of force – banjo heads are generally much tighter than drum heads.
So, I set the fence on my table saw and sliced the long cylinder into 4-1/2″ rings to make the banjo shell. I cut and laminated two rings into an uncut ring for a triple-thick arrangement, that works out to about 5/8″ thick, with 24 maple veneer laminations in all.
In the photo above you can see the thick laminated banjo shell sitting behind some regular drum thickness rings.
Here’s a shot of Michael – a classic pose:

This is going to be a big tenor banjo, you betcha!
Since Vega is to be the inspiration, I figured I’d want to emulate the styling of the hardware as well as the neck and other features. As a matter of getting it underway, I decided to make the hooks and nuts first, because I’ve always liked the ball-end nuts Vega used on all those old time banjos. Here’s a shot of a real Vega unit, alongside my oversize replica:

Some decisions are being put off as the project gets underway, so at this point, we’re going with brass for all the hardware. Maybe later we’ll have it all nickel plated, but the brass has a nice “contemporary old-time” look, if you know what I mean.
Now, some of this old time banjo hardware was rather elegant in its design, from mechanical working standpoint as well as visual. I really couldn’t pass up doing a bit of unnecessary machining on the nuts, and since it’s not visible on the finished instrument, I’ll try to take some credit on this page.
In order to make this cool nut, I worked with a two-piece design I’d seen on some from the 1890s. I bought a small supply of 1/2″ diameter brass balls, and drilled each one with a 5/16″ hole, almost all the way through, mounting the ball in my lathe collet to avoid marring its nice turned finish:

The main body of the nut was next, and I turned the end of some brass hex stock to fit the ball I’d drilled:

And, using a rounded “form tool,” I turned the nice contour where the nut transitions from the hex shape:

With the ball in place, the nut is starting to take shape, and only half a dozen or so operations remain to make it fully Vega-like. I drilled and threaded and formed the other end, drilled for thread clearance up to the ball, and ended up with nut that has a very pleasing shape, and is relieved to screw fully onto the hook. The idea is to be able to have lots of room for adjustment, so any variety of heads can be used, including a natural skin head if that becomes interesting. Check out the photo below, and you can see a good view of the inside:

And, here it is with the hook screwed on:

This nut gives a full one inch of adjustment, while completely covering the end of the threaded hook. It doesn’t bind or drag as it is turned because only nine threads are actually engaged.
Having finished up the nuts, I really had a sense this project would get off the ground, so I got busy on the rest of the hardware. Next up would be the tension hoop, hooks and the lugs for the shell.
A big boy banjo like this one would certainly need to have big hardware, and the tension hoop proved to be a fairly challenging bit of bending, starting with a six-foot long brass bar 1/4″ thick and 3/4″ wide. In order to make a smooth bend, I had to rig up a bending fixture on my milling machine, so I set things up with a pair of heavy machine vises, each with a stack of ball bearings to act as rollers – that way I could easily adjust the spacing between the rollers. To drive the bar past the rollers, I used a simple one-inch diameter aluminum rod held in the machine quill. As I started to roll the bar past the uprights, I pressed it toward the rollers by drawing the mill table forward, running the machine at 50 RPM, its slowest speed:

I ran the bar through multiple times, with each pass decreasing the radius of the curve until I reached the approximate size I needcd:

Then, it was over to the vise to cut and file a nice overlap joint preparatory to silver-brazing it together into a ring that would fit right over the head. After some serious cleanup with sandpaper and files, I had a nice fit:

The next bit of machine work took quite a while as I machined the decorative end of all the lugs to go around the shell. I made each lug with a ball end and a turned, drilled and tapped segment that would be pressed into the wall of the shell, and secured with a screw from the inside:

Then I held the part by the stem end and turned the decorative bits with various form tools, finally pressing the decorative “rope” pattern feature using a concave knurling tool I’d made some years ago to use for some special projects:

I swear it felt like it took me half a day to mark out the spacing for the 24 lugs around the shell, taking into account the need for a slightly wider spacing at the tailpiece and neck positions. “Measure twice – cut once” is the old woodworker’s adage, but this time I think I measured a dozen times before I got it right:

Ordinarily it can be a bit tricky to align a drill for boring holes squarely in a big round surface, but since this giant banjo actually straddled my drill press table, it was almost automatically lined right up as I drilled the two dozen holes:

Once I had all those holes laid out and drilled, and the lugs installed I was able to slip on the tension hoop to mark the location of the 24 hooks, thereby making certain that all the hooks would line up nicely. With the locations marked out, I clamped the tension hoop to the mill table, and used a 1/4″ ball end mill to rough out a notch for each of the hooks:

It took a bit of hand filing to make the notches rounded and contour to fit the ends of the hooks. Without that little touch, the hooks might not be able to handle the appropriate tension without deforming or breaking at their bent ends:

I made the hooks from brass, too, using 1/4″ diameter rod. To form this stuff to such a sharp curve, I heated the material to a dull red, and bent it in a simple, dedicated fixture I made up for this job:

Over on the milling machine, I was easily able to trim the ends of the hooks to a nice uniform shape and length:

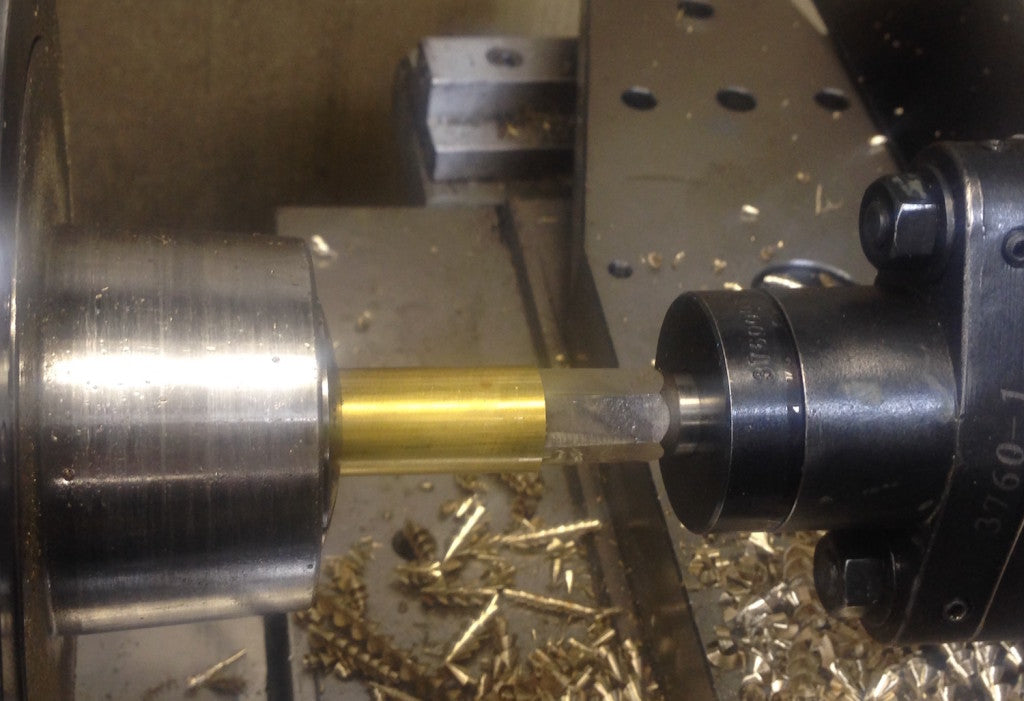
Because I’ve basically been designing this thing as I go, I actually made all the hooks before I figured out what length I’d need, so I didn’t cut or thread their ends until I had the shell together with head, tension hoop and lugs in place. Once I finally decided on length, I had a bit of a harder job threading them than I might have otherwise, but for only 24, it wasn’t too big an issue to do them individually, by inserting them backwards into the lathe collet, mounting the collet and running a threading die in the lathe tailstock:


Well, here’s the shell all assembled:

Naturally, the first thing the guys in the shop did was tease me about having a wrench to tighten the head on this big banjo, so I had to rise to the occasion, and make one up. I happen to have a tool called a “rotary broach” so I could form a hexagonal hole in a brass rod to make the 1/2″ banjo wrench I needed right on my lathe. Here are a couple of photos of the process and the finished tool:


Whew! That’s it so far, with a lot more stuff to come. Next, we’ll be laying out and making the neck, a few more small metal bits, and making some decisions along the way. This banjo will continue to be a scaled-up version of the classic 1920s 17-fret Vega tenor, so it will need a big tailpiece, an appropriate neck, and maybe a resonator.
After some serious rummaging in our special wood pile upstairs, I found a likely piece of maple for the neck of this beast:
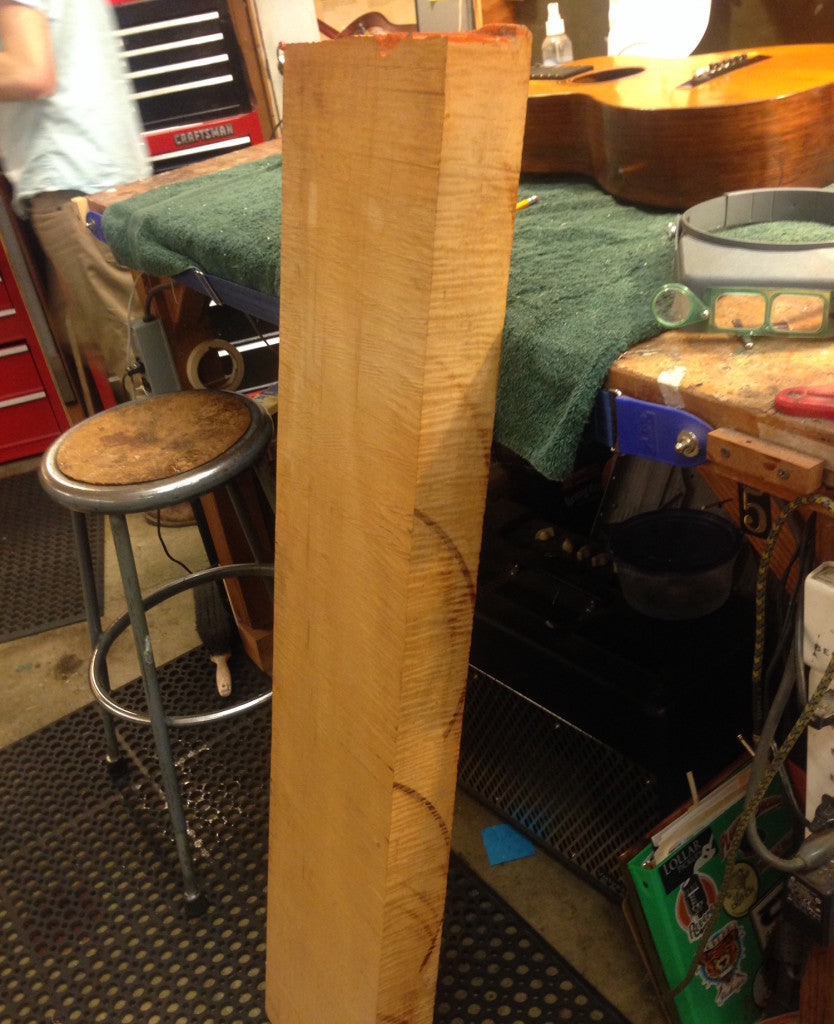
We actually bought this hunk of maple at MacBeath Hardwoods (Berkeley, CA) in 1971. It’s eastern hard maple, a solid 3-1/2 inches thick and by now rather thoroughly air-dried, I’d say! Wrestling it over to the bandsaw, we sliced off a section big enough for a one-piece bass banjo neck.
Here’s James cutting the profile, after laying out and marking the side view of the neck:

Oy – now here’s a fine little disaster! The cut revealed a little dark brown flaw in the wood, right at the curve of the heel:

It’s the kind of thing that can’t be detected from the outside before cutting, so we’ve learned to accept this kind of surprise, but, well, it is still disappointing. Had this been a different situation (and not such a giant piece of hard maple) we might well have tossed it out as unusable, but considering the scale and scope of this project, we thought a little “character” wouldn’t hurt anybody’s feelings. So, we’re going to proceed with our original enthusiasm intact. After all, it’s such a nice piece of figured maple.
Here’s some more material from our upstairs stash:

That’s some petrified strapping tape trying to hold a small stack of fingerboards together. I don’t recall the exact date, but these date from the 1970s sometime ordered from the Vitali Imports catalog. They are oversize and overlength fine quality ebony fingerboards – just right for our bass banjo.
Some of the guys at Gryphon get into making electric basses, so a few years ago I’d made up templates for Gryphon’s Fret Saw to cut appropriate scale fingerboards. We’ve chosen 34″ for the bass banjo, so with that template mounted, we sliced the board for seventeen frets:

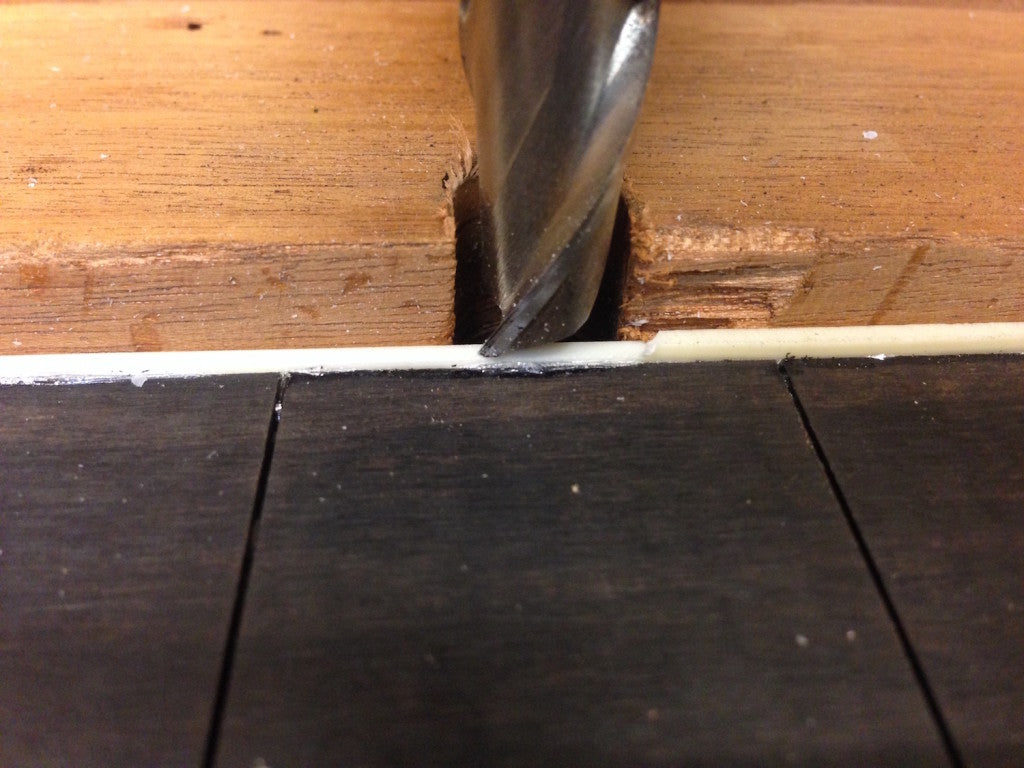
After profiling the tapered width of the fingerboard, I set up a simple wood fence on our milling machine to use a nice sharp end mill to cut the channel for ivory celluloid binding:

After the binding glue dried, I used the same setup, readjusted for height and depth, to trim the binding right in place:
Back to the neck blank itself, here’s a shot of the heavy carbon fiber composite reinforcement we chose instead of an adjustable truss rod:

While this instrument will have the same scale as a Fender electric bass, the neck will be much heavier – more in keeping with the profile of a traditional “stand up” string bass. So, instead of a flexible, adjustable neck, we’ll have a heavy rigid one. Figuring that a bass banjo will not be used for sophisticated electric style playing, we’re never going to have to work with low action as we would with a jazz or rock style instrument.
I’d used the milling machine to produce the slot for the reinforcement, and I glued the carbon fiber in place without taking the neck off the machine:

Then, after the epoxy hardened, I could easily skim off the top of the rod and true everything up nicely by plowing through the super hard composite with a slightly damaged carbide end mill:

Carbon fiber composites are notoriously hard on cutting tools, so I don’t throw out end mills that get chipped or worn, because I can still use them for abusive jobs like this one.
The classic “Wagner Safe-T-Planer” made short work of truing up the back of the peghead and reducing it to approximate thickness:

We used the same tool to smooth out the top of the peghead, and glued on a nice 3/16″ thick ebony overlay.
After gluing on the fingerboard and roughing the vertical profile of the neck, we set about covering the face of the peghead with white paper and drawing the outline of the Vega-style peghead (scaled up to proportion, of course) and prepared to cut the peghead profile on the band saw.
Unlike guitar pegheads, banjo pegheads have their profiles cut at a ninety degree angle to the plane of the fingerboard, so we feel it’s important to maintain that tradition, even on a novelty instrument such as this one. We figured the easiest way to handle the neck on the bandsaw would be to make a simple fixture to support it, and we thought it would be simple to glue back the portion of the lumber we’d cut off earlier, using some low strength hot melt craft glue. To avoid cutting a complex pattern through too much extra material, we prepared to undercut some of it to provide a sort of tongue:


Here’s the setup, as we cut the profile at the required angle:

From here, it will be a fair amount of hand work to shape the neck, using the conventional draw knife, rasps and sandpaper.
Our Grizzly wood milling machine doubles as the strongest workbench in the shop, and having a height-adjustable table, it’s the ideal platform for this kind of heavy hand carving. I made up a simple wood fixture to hold the neck, and clamped it in the big milling vise, so I could really lean into the work:

Well, here’s a nice little break! That big ol’ nasty dark brown surprise spot became progressively smaller the deeper I carved on it, so now that the neck is down to dimension, the spot is only about a tenth as nasty looking:

Betcha we’ll be able to make it look presentable with a bit of creative bleach and paint work.
Well, that’s it for now – progress is slow on the carving and fitting up, partly because I’ve been spending an inordinate amount of time on the tuning pegs. That’s right – a big bass banjo will obviously need some big bass banjo tuners. You know what? I called all the logical suppliers, and they’re fresh out of oversize banjo pegs!
So, here’s a little teaser about that part of the project. After making and scrapping a bunch of trial efforts, I’ve come up with a working prototype, so it looks like I’ll actually be making a set of tuning pegs for this monster.
Banjos traditionally have “straight-line” tuners, that stick back rather than at right angles to the peghead, and it just wouldn’t do to jam on a set of right-angle guitar gears. While there are much more logical options, I started this project to make a complete scaled-up banjo, so I really don’t want to give up now. My model is a 17-fret Vega tenor, and it’s scaled up[ by a factor of 1-2/3 larger in all dimensions, so here’s a sneak peek at the tuner, alongside an vintage Grover mounted in the original Vega neck I’m using as a pattern:

My tuner has a 12:1 reduction, where the original Grover is 4:1. Rather than using straight gearing or planetary system, I chose to make mine with a cycloidal drive so I would be able to handle the design and construction with the machining equipment and skill I have available.
More progress photos when I can find them – something happened to my iPhone photo album.
FINISHED, at last! It’s been a busy month, with lots of small details to finish up – here’s a quick video of Ed playing the Big Banjo at a living room rehearsal with the Banjo Racketeers on October 31, 2016:
Here are some photos of the finished instrument:


And, just in time for the first Banjo Racketeers performance, our own Tom Culbertson painted the colorful head, featuring “Harold Teen,” the vintage comic strip character:
